Monday, November 23, 2009

Lab 9.1 Modifying Resources and Adding Dixes

Lab 9.1 Modifying Resources and Adding Dixes

In this lab, you will add a dialog box resource to an application, and include dialog data exchange (DDX) and dialog data validation (DDV). You will also use the resource editor to modify the menus and toolbar.

Estimated time to complete this lab: 60 minutes

To complete the exercises in this lab, you must have the required software. For detailed information about the labs and setup for the labs, see Labs in this course.

Objectives

After completing this lab, you will be able to:

® Create a dialog box template.
® Build a new class based on that template.
® Remove unused menu and toolbar items.
® Add an error string to the string table.
® Write code to handle a modal dialog box within an application.
® Use the new dialog class in an application.

Prerequisites
There are no prerequisites for this lab.
Exercises

The following exercises provide practice with the concepts and techniques covered in this chapter.

Exercise 1: Creating the Dialog Box Template

In this exercise, you will create a dialog box in which you choose the files to compare in the two panes of a splitter window.

® Exercise 2: Creating the Dialog Class and Providing for DDX and DDV

In this exercise, you will create a dialog class that is associated with your dialog box template. Then you will add member variables for all controls other than static text controls, and add simple DDX and DDV for the edit controls.

® Exercise 3: Modifying the Menus and Toolbar

In this exercise, you will use the Resource editor to modify the menus and toolbar for the Diff application.

® Exercise 4: Implementing a Modal Dialog Box in an Application

In this exercise, you will write the code to enable the resources you have created in the previous exercises.

® Exercise 5: Using the New Class in an Application

In this exercise, you will write the code to include the new class in an application.


  1. Exercise 1: Creating the Dialog Box Template


The code that forms the basis for this exercise is in \Labs\Ch09\Lab01\Baseline. Copy these files to your working directory.

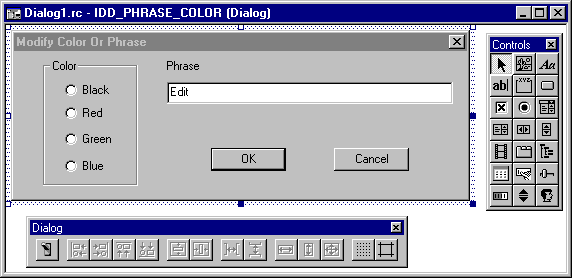
In this exercise, you will create a dialog box in which you choose the files to compare in the two panes of a splitter window. This dialog box cascades to the Open dialog box from the Common Dialogs library, as shown in the following illustration.

x

This exercise has three parts:

1. Creating the dialog box template

2. Adding controls to the dialog box template

3. Testing the dialog box template and setting the tab order


Creating the Dialog Box Template

In Part 1 of this exercise, use the Dialog editor to create the basic resource.

u Create a new dialog box resource

— On the Insert menu, click Resource, and then select the dialog resource from the list box and then clicking new, or by double-clicking on Dialog.


u Change the title and ID of a dialog box using the resource editor

1. Display the Dialog Properties property sheet by right-clicking anywhere in the window, and then clicking Properties.

2. In the Caption text box on the General tab, type Open Files, the title for the dialog box.

3. In the ID text box, type IDD_OPENFILES.


Adding Controls to the Dialog Box Template

By default, the dialog box template comes with OK and Cancel buttons in the upper-right corner. You will add other common controls to produce a dialog box. The default buttons will be first and second in the tab order, followed by the other controls in the order they are added. For now, do not assign Group or Tab stop properties to any of the controls. Use the following table as a guide for adding the remaining controls. Resize the dialog box frame as needed to contain the required controls.


Note In the static text controls, the ampersand establishes ALT key access to the control that follows in the tab order. A static control cannot have focus, so focus automatically flows to the next control in the tab-order sequence. In this case, the shortcut keys in the static-text labels provide access to the associated edit-box controls.


Add these controls, including their caption strings and IDs.

Control type Caption string ID


Static text &Compare File: IDC_STATIC (default)

Edit box none IDC_EDIT_FILE1

Static text &With File: IDC_STATIC (default)

Edit box none IDC_EDIT_FILE2

Push button Browse... IDC_BUTTON_FILE1_BROWSE

Push button Browse... IDC_BUTTON_FILE2_BROWSE


u Open the IDD_OPENFILES dialog box resource

You will be adding a series of common controls to populate the dialog box. At any time in this process, you can resize the dialog-box frame to contain the controls.


u Add a common control to the dialog box template

These are general instructions. The type of tool you select on the Controls toolbar dictates the type of control that is drawn on the dialog box template.

1. On the Controls toolbar, click the control you want.

ToolTips provide information about the functionality of each tool, as does Visual C++ Help.


Note If the Controls toolbar is not visible, right-click a toolbar and click Controls on the shortcut menu.


2. In the Dialog editor window, click the client area to add a control of the type specified.

As an alternative, you can also simply drag a control from the Controls window to the destination in the client area.

3. Resize and reposition the control as needed.


u Set the caption text of a control

— Right-click the control and click Properties. In the property sheet for that control, type the caption in the Caption edit box.


u Locate and identify tools on the Controls toolbar

— Point to individual tool buttons. A ToolTip that identifies each button should appear as the mouse pointer pauses over each button.


u Add an edit control to the dialog box template

1. Place the Edit control below the Static Text control.

2. Change the ID of the Edit control to IDC_EDIT_FILE1.


u Add an &With File: Static Text control and an edit control below it

— Use IDC_EDIT_FILE2 as the Edit-control ID.


u Add two push buttons, placing one to the right of each edit control

— To the buttons, assign the caption Browse... .

The three dots after these captions will display another dialog box. Assign the IDs IDC_BUTTON_FILE1_BROWSE and IDC_BUTTON_FILE2_BROWSE.


u Align the controls

— Use commands on the Layout menu.


u Save the current file

Testing the Dialog Box Template and Setting the Tab Order

In this final part of the exercise, you will use test mode to check various aspects of control functionality. After you exit test mode, you will change the tab order.

Set a new tab order for the controls in the following order:

® Compare File

® Edit box (for Compare File)

® Browse button (for Compare File)

® With File

® Edit box (for With File)

® Browse button (for With File)

® OK button

® Cancel button


The following illustration shows the correct tab order.

x

u Test the dialog box resource

1. Enter test mode by clicking the test tool on the Dialog toolbar, or by entering Ctrl+T.

2. Press the tab key several times to cycle through the controls.

Notice the effect and ordering.

3. Select an edit control. Type a text string, such as Testing.

4. Click either the OK or Cancel button to exit the test mode.


u Set the tab order for the controls on the dialog box template

1. On the Layout menu, click Tab Order.

The property sheet is hidden. The Dialog editor now displays a number for each of the controls in your dialog box template. By default, the numbers indicate the order in which each control was added to the template.

&nb

Using List Boxes

Using List Boxes

This section describes how to initialize and retrieve information from list boxes, and how to use list boxes in advanced ways.

The controls introduced in earlier sections of this chapter are very simple. They represent a single piece of information whose value you want to get or set. Interaction with these controls can be limited to DDX through a single dialog class data member.

Because the nature of list boxes is more complicated, it is often necessary to add a control variable to the dialog box class. This control variable allows easy initialization and enables you to call all the member functions of the list box class. ClassWizard creates this control variable for you. Because the list boxes must be preloaded with information, the CDialog::OnInitDialog function is often overridden. This section explains how to write code to use these complex controls in list boxes.

This section includes the following topics:

Initializing a List Box

When ClassWizard adds a variable to a dialog box class, the variable can be one of two types: a value member variable or a control member variable. With most of the simple controls — edit controls, check boxes, and radio buttons — you can use a value member variable.

When initializing a list box, deciding whether to use a value or control member variable is more complex and depends on what you want to do with the data. You need a value member variable so you can get an individual value back from the list box. The value member variable makes it easy to retrieve the string (or int) from the list box. You may also need a control member variable so that you can insert many data items into the list box. The solution is to add both types of variables, or in some cases, just a value member variable.

Note Initialization can be done without creating the control member variable. However, it is easier to use the control member variable.

The following example code is for a dialog box that contains a list box with the Sort property cleared. ClassWizard adds both an int (value member variable) and a control member variable to the dialog box class, which is named m_color and m_colorListBox. The effect in the dialog box class's header file is as follows.

class CColorListDlg : public CDialog
{
...
// Dialog Data
//{{AFX_DATA(CColorListDlg)
enum { IDD = IDD_PHRASE_COLOR2 };
CListBox m_colorListBox;
int m_color;
//}}AFX_DATA
...
};

OnInitDialog is the appropriate place to initialize list boxes and perform any other specialized processing. When you override this function, place the code where the comments indicate, and do not modify the AppWizard-generated code.

List boxes that are represented in the dialog box class by control member variables are initialized in the way shown in the following example code:

BOOL CColorListDlg::OnInitDialog()
{
CDialog::OnInitDialog();
m_colorListBox.AddString("Black");
m_colorListBox.AddString("Red");
m_colorListBox.AddString("Green");
m_colorListBox.AddString("Blue");
m_colorListBox.SetCurSel(0);
...
}

List boxes represented in the dialog class by only a value member variable are initialized in the way shown in the following example code:

CListBox * clb = (CListBox *)GetDlgItem(IDC_COLOR_LIST);
clb->AddString("Black");
clb->AddString("Red");
clb->AddString("Green");
clb->AddString("Blue");
clb->SetCurSel(0);

Setting the height of a list box is handled during initialization. To do this, define the number of items in the list box before it is displayed. The following code sets the height of a list box at run time.

// These are the steps needed to precisely set the
// height of the list box.
CRect rect;
int itemHeight;
m_colorListBox.GetClientRect(&rect);
m_colorListBox.MapWindowPoints(this, & rect);
itemHeight = m_colorListBox.GetItemHeight(0) + 1;
rect.bottom = rect.top + 4 * itemHeight;
m_colorListBox.MoveWindow(&rect);

Retrieving Information from a List Box

Once the value member variable is in place in the dialog class, DDX as performed in DoDataExchange places the user's selection into that variable. Use the variable as you would any other public data member of a class.

In the following example, the value member variable of the list box is an integer. This can be extracted very simply from the dialog class, where m_color is a public member that must then be converted to an RGB value for use by the document object:

if (IDOK == dlg.DoModal())
{
pDoc->SetPhrase(dlg.m_phrase);
pDoc->SetColor(IntToRgb(dlg.m_color));
Invalidate();
}

The function IntToRgb looks like the following code example:

COLORREF IntToRgb(int r)
{
switch(r)
{
case 1:
return RED;
case 2:
return GREEN;
case 3:
return BLUE;
default:
return BLACK;
}
}

Note If you clear the Sort option, the member variable can be an int corresponding to the index of the item in the list, or a CString for the selection.

For more information about list boxes, see "CListBox" in Visual C++ Help.

Sample Applications

Here are short descriptions of the sample applications related to this chapter. These sample applications are located in the folder \Samples\Ch09.

Sample application subfolder Description of application

\Modal Shows how to implement a modal dialog box.

\Tabbed Shows how to implement a modal tab dialog box with two property sheets.

Self-Check Questions

1. For which controls are groups especially important?

A. Radio buttons
B. Static text controls
C. Up-down (spin) controls
D. All controls

2. What results when you use ClassWizard to create a dialog member variable and bind it to a control?
A. A new class is automatically generated for the parent dialog box.
B. A new CControl-derived class is created and an instance of this class is embedded in the parent dialog class.
C. A new member variable is created in the parent dialog class.
D. ClassWizard generates no source code, but maintains this information in the project’s .clw file.

3. Which one of the following statements is true about the relationship of DDX and DDV?
A. DDX and DDV occur when the user clicks OK.
B. The developer can force DDX and DDV by calling CWnd::DoDataExchange.
C. The developer cannot extend DDX and DDV.
D. DDX and DDV are mutually exclusive; only one can be performed for each control.

Creating an Instance of the Dialog Box Class

Creating an Instance of the Dialog Box Class
The final step for creating a dialog box is writing the code to create an instance of the dialog box class.

To create an instance of a dialog box class
1. Include the dialog class's header file.
2. Create the dialog box object.
3. Initialize the data members in the dialog box.
4. Display the dialog box.
5. Use the data from the data members in the dialog box.

The include statement follows:
#include "Dialogs.h"

The following code sample shows you how to create, initialize, display, and use the data in a modal dialog box.

void CDialog1View::OnModifyShowdialog()
{
CDialog1Doc* pDoc = GetDocument();
ASSERT_VALID(pDoc);
// Create the dialog box object
CColorPhraseDlg dlg;
// Load the dialog box's members before
// displaying it.
dlg.m_phrase = pDoc->GetPhrase();
dlg.m_color = RgbToInt(pDoc->GetColor());
// Display the dialog box.
// If the user clicks on OK, replace the
// document's members with the fields from
// the dialog box, and repaint the view.
if (IDOK == dlg.DoModal())
{
pDoc->SetPhrase(dlg.m_phrase);
pDoc->SetColor(IntToRgb(dlg.m_color));
Invalidate();
}
}

Creating

void CDialog1View::OnModifyShowdialog()
{
CDialog1Doc* pDoc = GetDocument();
ASSERT_VALID(pDoc);
// Create the dialog box object
CColorPhraseDlg dlg;
// Load the dialog box's members before
// displaying it.
dlg.m_phrase = pDoc->GetPhrase();
dlg.m_color = RgbToInt(pDoc->GetColor());
// Display the dialog box.
// If the user clicks on OK, replace the
// document's members with the fields from
// the dialog box, and repaint the view.
if (IDOK == dlg.DoModal())
{
pDoc->SetPhrase(dlg.m_phrase);
pDoc->SetColor(IntToRgb(dlg.m_color));
Invalidate();
}
}

Creating Property Sheets
Property sheets are used for setting the properties of objects within your application. Property sheets are a special kind of dialog box made up of tabbed pages, called property pages, which are displayed one at a time as the user selects tabs at the top. Arranging a large amount of information in groups on a property sheet makes it easier to understand. To see an illustration of a property sheet, click this icon.


Property sheets consist of two main parts: the containing dialog box, and one or more property pages. You create property sheets by using the CPropertySheet object.

If you do not want to use the default CPropertySheet object, you can also create a dialog box by using the Dialog editor. You can then create a class for it and derive the class from CPropertySheet. The following procedure shows you how to use the derived class method.

To create property pages
1. In ResourceView, right-click the Dialog folder and then click Insert.
2. To invoke the Dialog editor, in the Insert Resource dialog box, expand the Dialog folder and double-click IDD_PROPPAGE_LARGE, IDD_PROPPAGE_MEDIUM or IDD_PROPPAGE_SMALL.
3. Add controls to the property page.
4. Create a class for each dialog box that is derived from CPropertyPage.
ClassWizard will automate this process, but be sure to set the base class to CPropertyPage.


To create a property sheet
1. Create the property page objects.
2. Create a CPropertySheet object that will contain the property page objects.
3. Add the property page objects. Be sure to add the largest page first because it will set the overall size of the dialog box.
The tabs for the top of each property sheet are inserted by the CPropertySheet::AddPage method. See the sample code at the end of this topic for details.
4. If you want the property sheet to be deployed as a modal dialog box, use DoModal. Modeless property sheets are created and deployed like ordinary modeless dialog boxes.

Note If the user of the application clicks the OK button, the property sheet will extract the values from the individual property page objects.

To see sample code that shows how to create a property sheet, click this icon.
void CTabbedColorPhraseView::OnModifyShowtabbeddialogbox()
{
CTabbedColorPhraseDoc* pDoc = GetDocument();
ASSERT_VALID(pDoc);
// Create each property page object and initialize
// as appropriate.
CPhraseTab phraseTab;
phraseTab.m_phrase = pDoc->GetPhrase();
CColorTab colorTab;
colorTab.m_color = pDoc->GetColor();
// Create the property sheet object and give it a
// title.
CPropertySheet cps("Modify Phrase or Color");
// Add the largest property page first.
cps.AddPage(&phraseTab);
cps.AddPage(&colorTab);
// Since this is being displayed modally instead of
// modelessly, remove the Apply button, which
// appears by default on Property Sheets.
cps.m_psh.dwFlags |= PSH_NOAPPLYNOW;
// If the user clicks on OK and either color or
// phrase has changed, update the document and
// invalidate the view.
if (IDOK == cps.DoModal())
if (pDoc->GetPhrase() != phraseTab.m_phrase ||
pDoc->GetColor() != colorTab.m_color)
{
pDoc->SetColor(colorTab.m_color);
pDoc->SetPhrase(phraseTab.m_phrase);
Invalidate();
}
}

For information about style considerations for property sheets, see The Windows Interface Guidelines for Software Design.

Using Common Dialog Boxes

The Common Dialog Box Library (CommDlg.dll) contains a set of dialog boxes for performing routine tasks, such as opening files and printing documents. The common dialog boxes provide a uniform user interface that helps users carry out these routine tasks without having to learn new techniques with each application.

The following table describes the dialog boxes in the Common Dialog Box Library and provides the names of the base classes.

If you want to Use

Choose standard and custom colors CColorDialog

Open, save, and save as a file CFileDialog
Find and replace text CFindReplaceDialog
Select fonts CFontDialog
Set page setup options CPageSetupDialog
Set print options CPrintDialog
Common dialog boxes offer a large amount of prewritten functionality for your applications.

To use a common dialog box
1. Create an object of the appropriate class; for example, CFontDialog.
2. Modify the appropriate data member, or use accessor functions in the class to query or set property values.
3. Modify the code in the appropriate handler to invoke DoModal from the dialog box class object, if it is a modal dialog box. The only modeless common dialog box is CFindReplaceDialog.

Designing and Creating Dialog Boxes

Designing and Creating Dialog Boxes
This section describes dialog box architecture and the types of dialog boxes, and how to design, build, and test a dialog box.

First, you will learn how to add controls to a dialog box resource using the Dialog editor. Then you will be introduced to the primary properties of most of the controls found in dialog boxes. Finally, you will learn how to test dialog boxes during development.

This section includes the following topics:

Dialog Box Architecture
Before building dialog boxes, you need to understand how they work. Data for dialog boxes comes from three sources: a dialog box resource, a dialogbox object, and a document object. To see an illustration of the dialog box architecture, click this icon.


The purposes of the dialog box resource, dialog box object, and document object can be described as follows:
® A dialog box is a graphical object that gets data from, and gives data to, the user. This graphical interface is created from a dialog box template provided by Developer Studio. When you finish adding controls to this template, it becomes the dialog box resource that Windows uses to draw the dialog box on the screen. When you create the resource using the Dialog editor, the dialog box resource is available to your application at run time.
® A dialog box object provides a place to put default values for controls in the dialog box. The dialog box class is created in ClassWizard. Objects of the dialog box class enable communication between the dialog box and the application.
® The document object is a general term that describes a place in memory from which a dialog box draws data. For example, the data that populates the Summary Information dialog box of a word-processing file (such as the file name and author) comes from a document object. In this case, it is the file that the user is editing. Similarly, in dialog boxes that display Help topics, the document object is the Help file itself.

This expert point of view explains how dialog boxes work

Types of Dialog Boxes

You can design and create two types of dialog boxes: modal and modeless.

Modal Dialog Boxes

When using modal dialog boxes, the user needs to perform an action in the dialog box before continuing to use the application. For example, a File Open dialog box closes only after the user performs an action, such as selecting a file name and clicking OK. The user is then returned to the application. From the system's point of view, starting a modal dialog box is like making a function call: the caller (or application) waits until something is returned by the called function (dialog box) before taking the next action.

Modeless Dialog Boxes

In contrast, when the user invokes modeless dialog boxes, the dialog boxes remain on the screen and allow user interaction with the application. A find-and-replace dialog box is a typical modeless dialog box. From the system's point of view, a modeless dialog box is a second process that needs to be supported.

Note Most of the initial work to create a dialog box is the same for modal and modeless types. However, you will need to write additional code for a modeless dialog box to enable reciprocal communication with its parent application. This course covers the creation of modal dialog boxes only. For information about creating modeless dialog boxes, search for "modeless dialog boxes" in Visual C++ Help.

Creating a Dialog Box
The dialog box template provided by Developer Studio creates the basic interface for a dialog box. By default, the template provides a window with a caption, a Close button, and OK and Cancel buttons. You can remove or alter these controls and add more controls to the template to complete the functionality of the dialog box. This template, with the changes you make, becomes the basis for the dialog box resource that your application uses.


To create a simple dialog box template in a project
1. On the Insert menu, click Resource.
2. In the Insert Resource dialog box, click Dialog, and then click New.


When you create a dialog box resource, it is assigned a unique symbol name to be used by the operating system, an ID value, and a caption. You can modify these in the Dialog Properties property sheet.

Adding Controls

A control is any item, usually visual in nature, that can be placed in a dialog box to provide functionality to the user. For example, edit controls provide the user with text strings; groups of option (or radio) buttons provide the user with mutually exclusive choices.

From the application's perspective, controls are actually child windows of the dialog box window. Controls communicate with the parent dialog box through event-notification messages. This illustration shows a list of the standard controls.


By default, the Controls toolbar is displayed while the Dialog editor is open. You can use the toolbar to add controls to the dialog box template.

On the Layout menu, the Dialog editor provides layout tools for aligning, sizing, spacing, and positioning controls. You can also use these layout tools for testing the template. To copy and paste controls from other dialog boxes, you can use the Cut, Copy, and Paste commands.

To add a control to a dialog box template

1. On the Controls toolbar, click the control you want to place in the template, and then drag the control to the dialog box template.

You can resize the control by dragging any of the handles on the control. Move the control by dragging it to the location you want on the template.
2. To see the property sheet for the new control, right-click the control and click Properties.

Control Properties
The properties associated with a control determine the behavior and appearance of the control. The control ID, also a property of the control, helps identify the control when events occur that the control needs to handle.


To set the properties of a control, use the property sheet associated with that control. To access the property sheet, right-click the control and click Properties on the shortcut menu. To see the property sheet for the Edit control, click this icon.


For information about individual control options, see Visual C++ Help.

To set properties for controls
1. While in the Dialog editor, right-click the control for which you want to set properties.
2. Click Properties on the shortcut menu.
3. Set the properties you want for the control.

To keep the property sheet on top while you edit a control's properties, click the Keep Visible button (pushpin) in the upper-left corner of the property sheet.


Setting Tab Order and Grouping Controls

Once you place controls in a dialog box template, you can define the order in which the focus moves from one control to the next when the user presses the TAB key. You can also organize the controls into logical or functional groups.


Tab Order

Tab order is the order in which the controls in a dialog box receive focus when the user presses the TAB key (or in some cases, an arrow key).

When the user presses the tab key, the system looks for the next control in the tab order that has the Tab stop property set.

To set the tab order of controls

1. In the Dialog editor, press CTRL+D, or click Tab Order on the Layout menu.
A numbered tag is placed beside each control in the dialog box. These numbers show the tab order for the controls.
2. To change the tab order, click the controls in the sequence of the tab order you want.
3. Press ESC or CTRL+D when you are finished.

To see an illustration of the default tab order for a sample dialog box, click this icon.


Control Groups

Microsoft Visual C++ offers a tool for arranging controls according to function, called the Group Box control. Grouping controls makes it easier for a user to understand the structure of a dialog box.

A control often used in group boxes is the radio button. Groups of radio buttons offer the user one choice within a group of mutually exclusive options. For example, radio buttons are used to allow users to set paragraphs either left, right, or justified in a word processor.

When you use the Group Box control, however, you are only telling the user which controls are logically related. At design time, you must also specify in Windows which controls are logically grouped. You can do this by setting the Tab stop and Group properties on the General tab of the property sheet for the control.

To create a control group

1. To indicate the beginning of a group, select the Group check box on the property sheet of the first control in the group.
2. For all other controls in the group, clear the Group checkbox.
3. To signal the end of the group or the beginning of the next group, select the Group property of the next control in the tab order, even if it is a stand-alone control.


Testing the Dialog Box
While you're constructing a dialog box, you will want to see how the dialog box will function for the user. Microsoft Visual C++ provides a test mechanism. In test mode, controls are activated and accept user input in the standard manner. Shortcut keys and tab order are enabled as well. However, programmatic responses to user actions are not enabled.


To test a dialog box

1. In the Dialog editor, press CTRL+T, or click the Test button on the Dialog toolbar.
2. Test the dialog box features you want to see.
3. Press CTRL+T or click the Test button again to exit test mode.

To see the location of the Test button, click this icon.


Implementing the Dialog Box Class

This section describes how to create a dialog box class, how to add and initialize member variables, and how to add code to handle user input.


To make a dialog box functional, you must create a dialog box class and develop the code that implements the controls in the dialog box. The dialog box class is used by Windows to create space in memory for the dialog box.

The following illustration is a schematic diagram of a dialog box resource, a dialog box object, and a document object. The dialog box resource has two controls that have been set to their default values: the color of the phrase and the phrase itself in the Edit control. The dialog box is built from the resource and the object code; the results appear on the screen. To see the illustration, click this icon.


This section includes the following topics:

Creating the Dialog Box Class

The first step in implementing a dialog box is to create a dialog box class.

To create a dialog box class

1. Save the dialog box template that you have created.
2. With your new dialog box open in the Dialog editor, press CTRL+W to invoke ClassWizard.
3. On the Message Maps tab, click Add Class, and then choose New from the drop-down list.

To see an illustration of the New Class dialog box, click this icon.


4. Under Class information, type in a name for the new class, and select CDialog as the base class.
5. Verify that the dialog ID is the same ID as your dialog box template ID.

Note It is important to verify that the dialog box ID of the new class and the ID of the template are the same. These IDs tell the dialog box class which resource to check before building the window, filling the controls with their default values, and showing the dialog box on the screen.

Adding and Initializing Member Variables

Once you have created a dialog box class, you must add and initialize the member variables. In this section, you will learn how to do just that.


This section includes the following topics:

Adding Member Variables

Once you have created a dialog box class, add member variables to hold the initial values of the various controls. Two categories of member variables serve different purposes, described in this table.


Category Description

Values Value member variables are used to initialize and hold the value of the control. They can be of a variety of data types, depending on the type of control. For example, the value of an edit control may be a CString or an int. The value of a check box is a BOOL.

Controls Control member variables are objects that correspond to a control's type. They are generally used when interaction with a control goes beyond extracting its data. For example, when you use a list box control, you create a control variable of type CListBox. This enables you to use the CListBox member function on that control. This includes initializing the list box or extracting more than one string when Multiselect is enabled.

To add a member variable for a control

1. In ClassWizard, click the Member Variables tab.
2. In the Control IDs list box, select the ID for the control that you want to initialize.
3. Click Add Variable.

The Add Member Variable dialog box appears.
To see an illustration of the Add Member Variable dialog box, click this icon.


4. Assign a name to the variable, select a variable category, and then select a variable type for the member variable.
5. Click OK.

ClassWizard generates a class declaration and definitions for each member function in the designated header and implementation files, and adds the variable to your project.

ClassWizard also adds the member variables to the declaration of the new dialog box class, and adds code in the constructor to initialize these members to a default value, normally zero or NULL.

Initializing Member Variables

To complete the process of implementing a dialog box class, you need to initialize the member variables. There are two methods for initializing member variables:

® Initializing member variables in the constructor for the dialog box object
® Initializing member variables after the dialog box object is created

Initializing in the Constructor
Most simple controls are initialized in the constructor for the dialog box object. Examples of simple controls are the edit controls that use variables of the value category. For edit controls, the ClassWizard inserts a block into the constructor. You add statements after this block to change the initializations performed by the ClassWizard. The following example code shows this initialization:

CColorPhraseDlg::CColorPhraseDlg(CWnd* pParent /*=NULL*/)
: CDialog(CColorPhraseDlg::IDD, pParent)
{
//{{AFX_DATA_INIT(CColorPhraseDlg)
m_color = -1;
m_phrase = _T("");
//}}AFX_DATA_INIT
}

Initializing After You Create the Dialog Box Object
Members of a dialog box class are public by default. Consequently, they can be initialized by the object that creates and invokes the dialog box. The following example code shows how to do this:

void CDialog1View::OnModifyShowdialog()
{
CColorPhraseDlg dlg;
CDialog1Doc* pDoc = GetDocument();
ASSERT_VALID(pDoc);
// Load the dialog box's members before displaying
// it.
dlg.m_phrase = pDoc->GetPhrase();
dlg.m_color = RgbToInt(pDoc->GetColor());
...
}


Exchanging and Validating Dialog Box Input
Once you have used ClassWizard to associate data members in your dialog box class with specific controls in your dialog box, and have initialized the data members with default values for the controls, you need to add code to handle user input. In this section, you will learn how to add data exchange and data validation to your dialog boxes.

The following illustration shows what the MFC framework provides for data exchange and validation versus what you must provide. It also builds on earlier descriptions of the relationships between dialog box resources, dialog box objects, and document objects. To see the illustration, click this icon.


This expert point of view explains how dialog data exchange (DDX) and dialog data validation (DDV) are implemented.

This section includes the following topics:

Dialog Data Exchange

When your code makes the call to display the dialog box by using DoModal, dialog data exchange (DDX) transfers the initial default values into the controls in the dialog box. When the user clicks OK and closes the dialog box, DDX stores the values from the controls in the dialog box in the corresponding dialog box object members. If the user clicks Cancel, DDX does not occur.
Dialog Data Validation
When adding member variables to the dialog class, in many cases you have the option to specify some validation criteria. At run time, when data is copied to the member variables, the dialog data validation (DDV) functions of DoDataExchange are also called. If validation fails, an error message box appears. Focus returns to the last control for which a corresponding DDV function was called, indicating to the user that the information contained in the control is invalid.

ClassWizard does most of the basic DDV work for you. It inserts the statements to verify that an edit box string does not exceed a given length, or that an integer is within a specified range. For more complex validation capabilities, you need to write additional code. For example, you need to write the code to determine whether an edit box is empty.

Implementing Exchange and Validation

DDX and DDV are handled by the function DoDataExchange, which is called by UpdateData. UpdateData takes either True or False as a parameter.

® UpdateData(FALSE) copies the member variables from the dialog class object to the controls in the dialog box.
® UpdateData(TRUE) copies data from the controls in the dialog box to the member variables of the dialog class object.

If you don't call UpdateData with a parameter, the default is True.
You call UpdateData whenever data transfer is appropriate. For example, use the UpdateData function from the Apply button of a modeless dialog box, with True as the argument.
The DoDataExchange routine can contain many DDX and DDV routines. However, if a DDV routine exists, it must follow immediately after its associated DDX routine in the data map.

Note ClassWizard edits DDX and DDV routines placed between the lines //{{AFX_DATA_MAP(CMyDialog) and //}}AFX_DATA_MAP. Add any custom DDX and DDV routines outside these special comments.

This sample code demonstrates the data exchange and validation of a single CString member variable, m_phrase.

void CMyDlg::DoDataExchange(CDataExchange* pDX)
{
CDialog::DoDataExchange(pDX);
//{{AFX_DATA_MAP(CColorPhraseDlg)
DDX_Text(pDX, IDC_PHRASE, m_phrase);
DDV_MaxChars(pDX, m_phrase, 50);
//}}AFX_DATA_MAP
}

Note If a validation fails, the system returns to the dialog box, queries which control was involved in the exchange, sets the focus to that control, and indicates that the validation has failed.

Chapter 9: Creating and Using Dialog Boxes

Chapter 9: Creating and Using Dialog Boxes

Windows-based applications get information from and give information to the user through the dialog box. This chapter covers techniques for creating and managing dialog boxes in the Windows operating system.

First, the chapter covers dialog box design, such as adding controls, setting properties, and defining how the user moves within the dialog box. Next, the chapter discusses how to use ClassWizard to add and complete the code that actually implements the dialog box and enables its controls, including how to handle user input. The chapter then explains how to create an instance of the class.

Objectives

After completing this chapter, you will be able to:

® Define the different types of dialog boxes.

® Explain how dialog boxes are built by using the Microsoft Foundation Class Library.

® Use the Dialog editor to create a dialog box template.

® Use ClassWizard to create dialog box classes.

® Write code to manage dialog data exchange (DDX) and dialog data validation (DDV).

® Create an instance of the dialog box class.

® Use and customize common dialog boxes.

® Create property sheets.

Lab 8.4: Adding a Pane to the Status Bar

Lab 8.4: Adding a Pane to the Status BarIn this lab, you will add a pane to the status bar that will display the time.

Estimated time to complete this lab: 45 minutes

To complete the exercises in this lab, you must have the required software. For detailed information about the labs and setup for the labs, see Labs in this course.

Objectives

After completing this lab, you will be able to:

® Add a pane to a status bar.
® Provide a handler to update the displayed text.

Prerequisites
There are no prerequisites for this lab.

Exercise

The following exercise provides practice with the concepts and techniques covered in this chapter:

® Exercise 1: Implementing a Time Pane

In this exercise, you will add a new pane to the status bar and set its text to the current time. You will also add a command handler to provide updates to the status bar.

® Exercise 1: Implementing a Time Pane

Create a simple SDI application saved as TimeStamp.

In this exercise, you will add a new pane to the status bar and set its text to the current time. Use an UPDATE_COMMAND_UI handler to provide updates to the status bar.

CStatusBar includes support for adding panes to the status bar. The framework stores pane identifier information in an array with the leftmost pane at position 0 in the array. When you create a status bar, you use an array of pane IDs that the framework associates with the corresponding panes. You can then either use the pane ID or the array index to access a pane.

By default, the first pane is "elastic": It takes up the status bar length not used by the other panes, so that the other panes are right-aligned.

If you examine CMainFrame::On Create, you can find the creation code for the status bar:

if (!m_wndStatusBar.Create(this) ||
!m_wndStatusBar.SetIndicators(indicators,
sizeof(indicators)/sizeof(UINT)))

In the code above, CStatusBar::SetIndicators uses the strings associated with the pane IDs in the indicators array to size and initialize the text that appears in the panes. To add a pane, you must create a new identifier for the pane and then add the identifier for it to the indicator array.

Add a pane to the status bar

Every status-bar pane is associated with an ID. To create an ID for the new pane, you will add a new ID using a dummy menu. A dummy menu is a menu resource that is used to store IDs that are used in your application, but that are not directly used by a menu. Another reason for using a dummy menu for creating an ID is that ClassWizard can be used to add handlers for the ID.

1. In ResourceView, right-click the menu resource and insert a new menu.
2. Right-click the new top-level menu item and select Properties. Select the Keep Visible button (pushpin) in the Properties dialog box to keep the dialog box on top. Enter "DummyMenu" for the caption string.
3. Click on the new drop-down menu item to select it. Set the ID of the menu to ID_INDICATOR_TIME. Set the caption to some value that will remind you what the ID is for, such as ID INDICATOR PANE.
4. Set the prompt value to HH:MM AM. This value will determine the size of the pane as well as its initial value.
5. Open MainFrm.cpp.
6. Add ID_INDICATOR_TIME to the indicators array. Save MainFrm.cpp. The array follows:

static UINT indicators[] =
{
ID_SEPARATOR, // status line indicator
ID_INDICATOR_CAPS,
ID_INDICATOR_NUM,
ID_INDICATOR_SCRL,
ID_INDICATOR_TIME,
};

Update the time pane

Whenever the framework finishes processing all the pending messages for the MainFrame window, it sends itself a WM_IDLEUPDATECMDUI message. This message is one of the generators of the UPDATE_COMMAND_UI message that is sent by the system to CCmdTarget-derived objects such as CStatusBar. Use this message to force the update of the time pane.

1. Click ClassWizard on the View menu, or press CTRL+W. If a dialog box appears asking if you want to add a new class, click Cancel.
2. Click the Message Maps tab and select CMainFrame as the class name. In the Object IDs list box, select the new message identifier, ID_INDICATOR_TIME. Select UPDATE_COMMAND_UI as the message and add a function for this message. ClassWizard will prompt you for the function name. Rename the function to OnUpdateTime.
3. Click Edit Code. ClassWizard will place you in the body of the new handler. Code the OnUpdateTime function by creating a CTime object and initializing it to the current system time as follows:
CTime time = CTime::GetCurrentTime();
4. Use CTime::Format to format the time in HH:MM AM format and assign that string to a new CString.
CString sTime = time.Format ("%I:%M %p");
5. Set the text of the pane to the time:
pCmdUI->SetText(sTime);
6. Save MainFrm.cpp. The complete function follows:
void CMainFrame::OnUpdateTime(CCmdUI *pCmdUI)
{
CTime time = CTime::GetCurrentTime();
CString sTime = time.Format ("%I:%M %p");
// Now set the text of the pane.
pCmdUI->SetText(sTime);
}
7. Build and run the TimeStamp application. You will see the current time displayed in the fifth pane of the status bar as shown in the following illustration:


Use a timer to cause background updating

The TimeStamp application will show the time and update itself as long as there are messages for its frame window to process. However, TimeStamp is little more than a clock in a status bar. Without messages, a WM_IDLEUPDATECMDUI message is not sent to update the time pane. In this section, you can set up a timer for TimeStamp to process and update time.

1. Open MainFrm.cpp. At the end of the OnCreate function and before the return statement, set a timer that will send a message once a second. The ID of this timer is irrelevant and can therefore be any value; there is no callback function.

SetTimer(1234,1000, NULL);

2. Click ClassWizard on the View menu, or press CTRL+W.

3. In the CMainFrame class, add a function for WM_TIMER. Even though you cannot add functionality to the default behavior, you must map the message through a function for the message pump to empty the queue and send the UPDATE_COMMAND_UI message. You can leave the OnTimer handler as provided or you can comment out the call to the default function.

4. Save MainFrm.cpp. Build and run TimeStamp.exe. You will notice that the timer pane updates properly whether or not TimeStamp.exe is in the foreground or background and whether or not there has been activity in the window.

The completed code for this exercise is in \Labs\Ch08\Lab04\Ex01

Lab 8.3: Adding a Shortcut menu

Lab 8.3: Adding a Shortcut menu
In this lab, you will add a shortcut menu to an application.

Estimated time to complete this lab: 30 minutes

To complete the exercises in this lab, you must have the required software. For detailed information about the labs and setup for the labs, see Labs in this course.

Objectives

After completing this lab, you will be able to:

® Add a generic shortcut menu handler from the Component Gallery.
® Modify the menu resources associated with a shortcut menu.
® Process right-click messages to trigger a shortcut menu.
® Process messages sent from a shortcut menu.

Prerequisites

There are no prerequisites for this lab.

Exercise

The following exercise provides practice with the concepts and techniques covered in this chapter.

® Exercise 1: Adding a Shortcut Menu Component

In this exercise, you will add a shortcut menu to an application using the Component Gallery.


Exercise 1: Adding a Shortcut Menu Component
The code that forms the basis for this exercise is in \Labs\Ch08\Lab03\Baseline. Copy these files to your working directory.

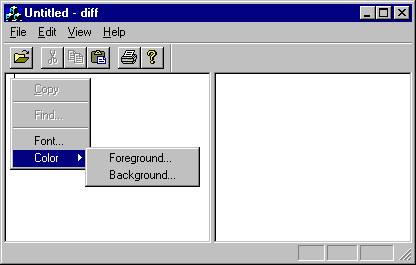
In this exercise, you will add a shortcut menu and its associated test handlers to an application. When a user clicks the right mouse button in either pane of the ShowDiff application, the application displays a menu at the location of the mouse click. Usually, displaying a menu in this manner is a very simple task. However, since ShowDiff uses CRichEditView based on the Rich Edit Control, the DefWindowProc will not translate WM_RBUTTONUP to WM_CONTEXTMENU automatically; you must do that translation yourself.

The following illustration shows how the application should look.


Insert the Pop-up Menu Component into CDiffView
1. On the Project menu, click Add to Project, and then click Components and Controls. In the Gallery dialog box, double-click Developer Studio Components The following illustration shows the Components and Controls Gallery dialog box.


2. Select Pop-up Menu, click Insert, and then click OK.
The Pop-up Menu dialog box will be displayed.
3. Add the pop-up menu to the CDiffView class. Leave the menu resource ID at its default, CG_IDR_POPUP_DIFF_VIEW, and click OK. The following illustration shows the completed Pop-up Menu dialog box.


4. The Component Gallery will insert an OnContextMenu handler into the implementation of CDiffView, DiffView.cpp, as shown in this code:

void CDiffView::OnContextMenu(CWnd*, CPoint point)
{
// CG: This block was added by the Popup Menu component
{
if (point.x == -1 && point.y == -1){
//keystroke invocation
CRect rect;
GetClientRect(rect);
ClientToScreen(rect);

point = rect.TopLeft();

point.Offset(5, 5);
}

CMenu menu;

VERIFY(menu.LoadMenu(CG_IDR_POPUP_DIFF_VIEW));

CMenu* pPopup = menu.GetSubMenu(0);

ASSERT(pPopup != NULL);
CWnd* pWndPopupOwner = this;

while (pWndPopupOwner->GetStyle() & WS_CHILD)

pWndPopupOwner = pWndPopupOwner->GetParent();

pPopup->TrackPopupMenu(TPM_LEFTALIGN | TPM_RIGHTBUTTON, point.x, point.y,

pWndPopupOwner);
}
}

Change the default menu to support ShowDiff

1. The Component Gallery will also add a menu resource to the project. Open the Menu editor in ResourceView and edit CG_IDR_POPUP_DIFF_VIEW.
2.. Change the menu as shown in this table. The items and their IDs are included.
Menu item ID

Copy ID_EDIT_COPY

Separator
Find... ID_EDIT_FIND
Separator
Font... ID_EDIT_FONT
Color (popup)
Foreground... IDC_EDIT_COLOR_FOREGROUND
Background... IDC_EDIT_COLOR_BACKGROUND
The following illustration shows the completed shortcut menu in the Menu editor.


3. Save Diff.rc.

Add a handler for WM_RBUTTONUP
1. Open ClassWizard from the View menu, or press CTRL+W.
2. Select the CDiffView class and CDiffView object ID.
3. Select the WM_RBUTTONUP message and then click Add Function.
4. Click Edit Code.
5. You will not use the default WM_RBUTTONUP handler in CRichEditView. Comment it out.
6. CView::OnRButtonUp is passed a CPoint relative to the client window. If you explore OnContextMenu, you will discover that CMenu::TrackPopupMenu requires a CPoint relative to the screen. Use CWnd::ClientToScreen to do this conversion, as shown in this code:
ClientToScreen (&point);
7. Call CDiffView::OnContextMenu with this point.
OnContextMenu ((CWnd *)NULL, point);
8. Save DiffView.cpp. The complete function follows.
void CDiffView::OnRButtonUp(UINT nFlags, CPoint point)
{
ClientToScreen (&point);
OnContextMenu ((CWnd *)NULL, point);
//CRichEditView::OnRButtonUp(nFlags, point);
}

Add message handlers for the menu items
1. Open ClassWizard from the View menu or press CTRL+W.
2. Select the CDiffView class.
3. Select the menu object IDs, adding a function for each COMMAND and accepting their default function names, as detailed in this table.

Object ID Function name

ID_EDIT_FONT OnEditFont

IDC_EDIT_COLOR_FOREGROUND OnEditColorForeground
IDC_EDIT_COLOR_BACKGROUND OnEditColorBackground
4. Choose one of these functions and click Edit Code to navigate to the handlers.
5. In each of the function bodies, add a message box to show that the handler has been called, as shown in this code:
void CDiffView::OnEditFont()
{
AfxMessageBox ("In OnEditFont()");
}
void CDiffView::OnEditColorForeground()
{
AfxMessageBox ("In OnEditColorForeground()");
}
void CDiffView::OnEditColorBackground()
{
AfxMessageBox ("In OnEditColorBackground()");
}
6. Save DiffView.cpp. Build ShowDiff and run it.

The completed code for this exercise is in \Labs\Ch08\Lab03\Ex01.